Saturday 31 December 2011

Building the Potager

We decided to dedicate December to building the potager (the kitchen garden). This was our first real step into self-sufficiency, and it needed to be; easy to manage; easy on the eye; large enough to supply our needs, and to supply a basket of fresh fruit and veg. in a welcome pack for guests to the cottages.

The final plan covers a 20 metre2 plot, bordered on the west side by mature trees, and the south by low farm hedging.


It is a very sunny position and the sun does not go down behind the mature trees until 3pm in the winter, so all the raised beds will be in full sun for most of the day.

The garden has been separated into three main areas.
1.  The fruit and vegetable raised beds....  (click on pictures for larger image)


The raised beds are 10 foot x 5 foot, and between 12 and 20 inches in height - as the plot is on a sloping site.

There are two beds dedicated to fruit, the larger being 10 foot x 10 foot and containing the fruit bushes - raspberries, gooseberries and blueberries, with some rhubarb.  Whilst the smaller will be used to grow strawberries and melons.

The six vegetable beds have been divided into brassicas, root vegetables and legumes, to enable us to rotate the crops each year.  We have used companion planting principles where possible, and used flowers like nasturtiums and marigolds to help us keep pests down.  However this is all design from books and research, and like most novices, I'm sure when we start planting we will learn far more from our experiences as to what likes our plot, soil and weather conditions. 

2.  The Flowerbed and Vines


The greenhouse is situated to get the most sunshine through the day, and the bench and table will have a lovely view over the flowerbed, that will be full of plants to attract the insects - Buddleia; Alyssum; Cornflower; Cosmos and Zinnia.  We will also be planting flowering plants for 'infusions', and intend to experiment with mixes of herbal teas - Chamomile; Verbena; Valerian and Echinacea.

The two vines will be used for table grapes and kiwis, both of which should grow well in this climate.

3.  The Herb Garden and Maintenance


Although we have planted a small amount of herbs in each raised bed, the majority will grow at the entrance to the potager, surrounded by blackberry, sloe and elderflower bushes.

This part of the garden is screened by mature trees, so the compost bins, water butt and leaf mould containers will all be sited here, out of view.

The first step was to measure everything out on the plot and lay out tarpaulin cut to size...


Amazing how small the beds looked when spaced out in the plot.
Then it was down to the JCB to clear the turf and then scrape away the top soil to re-use.


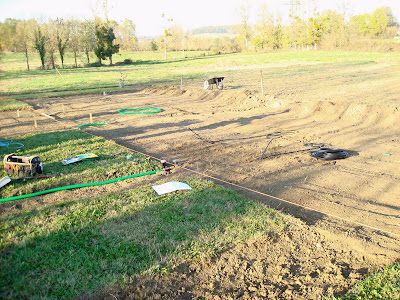
We then had to run all the water pipes from the water butt to supply collected rainwater and agricultural water to each of the beds..


We decided to use seep pipes on each of the beds, so we had to install filters throughout the system to ensure the the pipes did not get clogged with debris.


Then we had to start building the beds.  
Nick pulled up the oak floorboards in the little cottage to re-use for the raised beds.  They were too far gone to keep for floorboards, but when cut down they were still solid enough to recycle.


At the same time we needed to dig through the top soil..


Weeding out two full wheelbarrows of dandelion roots!


We decided to line the raised beds, as we weren't sure if any insect repellants had been used on the floorboards, and didn't want anything seeping into the soil.    The plastic pipes will act as holders for hoops which we can insert when we want to drape parts of the bed with mesh or fleece...


It was finally time to start filling the beds, and again we used the JCB to redistribute the manure from the farm...


We worked on a ratio of one third well-rotted manure and straw, then a layer of clay soil we took from the top of the dried pond, a layer of compost and then a final layer of sifted top soil.  Hopefully this will provide enough nutrients, and will loosen the clay soil sufficiently.  We kept one bed manure-free for the root crops, and part of the fruit bush bed was cordoned off as an ericaceous bed for the blueberries, and we filled with ericaceous compost and top soil.

We finished each bed with the seep pipes...


Then it was time to lay some pathways, before the winter became too muddy and wet...


And with an interesting tipper action for the quad and trailer....


We laid the gravel for the pathways....


And feeling quite deserving of some downtime, we have now packed up our tools, set the wine mulling, and put our order into the sawmills for wood for the fencing....

Friday 2 December 2011

A lot of landscaping

November is our month for landscaping our grounds.
Whenever I have considered landscaping a garden before, it has always been a combination of paving, hedging and large shrubs.  However with a plot this large, developing structure and colour in the garden means large scale tree planting.
We pulled together a plan to plant fast-growing trees to screen the road and telegraph poles, create an avenue along the entrance, and shape the gardens of each holiday cottage....


We have tried to use native species, or trees that we have seen growing widely in the local area to ensure that the planting is in keeping with the environment, and have included oaks, horse chestnut, and beech to provide focal points when mature.

As this part of France is truly beautiful in Summer, with the orchards in full leaf and the fields swaying with sunflowers and corn, we decided to plant the majority of our trees for Autumn colour.  We hope that the reds and yellows of the maples, gingko, sweetgum and tulip trees will provide a dramatic backdrop to the properties.

Using smaller trees near the buildings to define the edges of gardens and provide shade, we are also planting fruit trees - mulberry and figs - in each garden, so that guests can pick their own fruit to eat straight from the trees.

We ordered 75 small whips from the garden centre....


and 10 larger 3 year old fruit trees for an orchard...


So with 85 young trees to plant and at least 5 existing trees to transplant, we needed a system.

First we needed to cut 85 pieces of weed suppressing fabric - so a template was in order...


Then we needed to be able to take all our tools and materials with us round the plot, so the trailer was hitched to the quad and filled with tools, trees, compost and a water butt, and the JCB was loaded with a big bag of limestone gravel.


Fully prepared, we were ready to start the process...

1. Scrape the turf away...


2.  Dig the hole...


3. Sift through the big bag of compost to take out all the cockchafer grubs...


Apparently the cockchafer (May Bug) lays 60 - 80 eggs in the ground, and they develop into these grubs which live underground for 3 to 4 years eating roots. We seem to have all 80 in our bag of compost and not wishing to plant them to feed on our tree roots, we had to sift and squish them before planting.

4.  Fill the hole with sifted compost and plant young tree...


5.  Cover with weed supressant, fix wire netting to stop  animals from eating the young trees...


6.  Cover with limestone chipping, water and repeat.... a further 84 times!


Not forgetting to transplant and stake any nice young saplings growing too close to other trees to develop properly...


We were slightly disheartened to find, after planting all 75 young trees, that they were barely visible over such a large area.  So it was gratifying to finish the planting in the orchard with the larger fruit trees.  With a selection of cherry, pear, peach, nectarine, fig, walnut and sweet chestnut, we are hoping to be able to grow most of the fruit we will eat, and provide home grown fruit and nuts to our guests.


Now that the last tree has been planted and staked, we can stand back and admire what is a small but very healthy looking young orchard, and keep our fingers crossed that the rains will begin soon, and we will not have to water all 85 trees by hand.

A New Roof for the little Cottage

The first house to be renovated is the 16th century cottage.  It sits at the back of the whole plot and has its own private entrance from the road, so it can be screened off from the rest of the buildings and be rented as a finished holiday unit.
The most important task is to renew the roof before the winter weather causes any problems to the structure, which is still dry at the moment with no hint of that damp smell usually found in older properties.  However we want to tread carefully, conserving all the features we can and re-using as much of the original materials as possible - so progress is likely to be slow.

We need to break through the roof first, to be able to strip the old clay tiles...


Opening up the attic space reveals the beautiful wooden structure inside; the original ring beam and rafters, all solid oak, joined with original wooden pegs... 


Most of the original chestnut battens are sagging now with the weight of the original clay tiles, and will have to be replaced.  All the clay tiles need to be checked, moss removed and stacked for re-use where possible, whilst the chestnut will join the growing stack of firewood to see us through the winter.


When all the tiles have been removed, we can concentrate on building the structure of the dormers, and the velux windows at the rear.  We are keeping all the new windows and doors in proportion to the original structure, an important factor when we visited the Architectural Heritage department in Perigueux as part of our planning process.


Although it is now end August and the temperatures are in the high 30s, making each day on the roof an interesting challenge, it still feels good to start the process of covering the cottage again...


By laying the battens 12 inches apart on the way up, Nick is able to walk up them still, and then fill back in, to 4 inches apart, on the way back down...


And finally the battening is complete, and the cottage is at least weatherproof if we have any summer storms - although we have not had rain for 8 weeks.


We manage to save half of the original clay tiles, and source another 4000 reclaimed tiles, so having taken a welcome break collecting the tiles in the air-conditioned car and trailer - it is time to re-lay them..


There is still time within the process to ensure we replicate the craftsmanship that was on the original building though.  The original roof had a tiled vent, common to the houses of the Perigourdine region... 

So Nick creates a new decorative ventilation structure from wood we reclaim from inside the house, using the design motif we have seen on a number of the houses in the local villages....

We also use burr oak we have found in the house, to make beautiful facades for the new dormers...


The chimney also needs rebuilding to bring it up to current building regulations, and to ensure a good draw for the woodburner we will install in the fireplace...


And finally at the end of October we finish re-laying all 8000 old clay tiles....


And as November starts, we have only the ridge tiles to finish.  Some creative adaptations to the JCB to extend its reach, allow us to lay the hip and top ridge tiles...


And literally as we lay the last two ridge tiles, the raindrops start to patter down.... the first rain in the last 12 weeks.  It is only a shower, but as we put the tools away and close up the cottage, there is an overwhelming sense of pride in having completed the first stage of the renovation, and ensuring the little cottage is snug and dry for the coming winter.