Showing posts with label Plot. Show all posts

Tuesday, 4 September 2012

The Long Hot Summer

It seems ages since I posted on this blog.  It just seems that while the sun is shining and the weather is perfect, there is always something to do on a project as big as ours.

We are trying to finish the little house before Christmas, and still have so many things to complete.  My main task has been to renovate the exterior walls, which sounds like a relatively small undertaking, compared to the mountain of tasks that Nick has had to tackle.... but still it feels never-ending.

I had to chipper off all the render first, to expose the old stones.  I needed to dig out all the old pointing that was dry and dusty, until I got back to the original mud pointing that was still solid. As we wanted to expose the stones, for 'pierres apparantes' I had to remove sufficient to enable the stones to stand proud after repointing.  A hammer drill and a screwdriver, proved to be the most effective way to remove everything.


Having gone round the whole building twice, it was then time to clean the stones.  After trying a number of methods, I settled on diluted chlorine and wire brushes (the technique advocated by our neighbouring farmer).  It seems to take an age,  having gone round the entire property at ground level, I then had to start again with a platform for the upper level.  I can't say I'm looking forward to repeating this process on the barn!  However it is starting to look beautiful...

Just one more round cleaning the top of the walls, and then I can start repointing, and buttering them to finish.

We used a sandblaster on the inside walls to clean the areas we wanted to expose like the chimney breast, as we also needed to clean the old wooden beams


It was a much quicker process, but still hard work particularly in the deep sea diving helmet that allowed you to breathe clean air.  It was incredibly heavy, and the equipment rental firm had forgotten to give us a new visor for the front.
It was so difficult to see through the front panel (as the sand pitted the surface) that Nick had to remove it periodically to sand the surface flat....


Although I am quite proud of my efforts to date, they pale into insignificance when compared with the productivity of the man machine that is my partner.  In the time it has taken me so far to renovate the exterior walls, Nick has managed to....

Lay the foundations for the ground floor;  lay cabling to take all the electrics;  and pour and level the concrete.


To lay the flooring for the first floor, inch thick marine ply to ensure that it has no bounce...

 To construct a Hot Tub from cedar, fashioning the planks and constructing the metal banding and tighteners.....


Make hardwood windows by cutting down french doors, and fit all of the doors and windows....    Albeit I did lend a hand in the painting department.  A key task which I'm sure was pivotal in the overall development timeline!


 To construct a unique front door made from oak planks taken from the barn, cleaned and planed to form an entrance both beautiful and original.....


To lay the framework for the decking at the rear of the property, while we wait for the sawmill to cut the 90 metres2 of chestnut we will lay....


And most recently to construct an oak staircase, made again from the oak planks he has reclaimed and cleaned from the barn..

I would feel slightly overwhelmed by the productivity compared to my meagre efforts, but I have also had responsibility for the vegetable garden, and here I have definitely restored the balance.

My cherry tomatoes started to crop in August and I have had four weeks now of continual harvesting...

In fact there have been so many, I have slow roasted over 300 tomatoes.  I cut them in half, added a touch of salt and pepper and olive oil, and roasted them in the oven for 3 hours.  The depth of flavour is amazing, so sweet and sticky, and great to add to pasta or salads. I have frozen most of them and they can be used straight from the freezer without reheating.

My other great passion has now become 'cucurbits'.  I had never even heard of the word 8 weeks ago, but I now know that this is the family of pumpkins, squash and melons.  And my interest is down to the fact that I seem to have the ideal soil, conditions and weather for growing them.

The first notion I had was when I realised that I had quite a few pumpkins growing in the patch and they were starting to get quite big. From the tiny seeds that I had grown in the greenhouse there were some sizeable fruit and a lot more flowers still being pollinated by the bees...




I was quite amazed when they started to 
mature in August, swelling and ripening 
on the vine...


I had thought that pumpkins were harvested in October ready for Halloween, and yet mine were definitely ripe and ready to be hardened off in mid August.... and so we started harvesting them


My butternut squash have taken a similar journey.  Loads of tiny fruit set in July after the bees had done their work.... and then swelled on the vine...
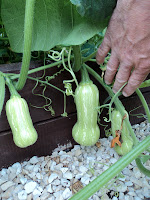
Until I had 35 huge squash gradually turning a deep biscuit colour in the August sunshine..


And I planted 6 canteloupe melon seeds.  After a profusion of tiny yellow flowers, the fruit started to grow....

I had read that it is best to cut off the smaller fruit to allow one or two per plant to reach full size, but I just didn't have the heart.  So I left all the fruit on the vine to see how many would ripen...


And it seems that the Dordogne sunshine and the heavily manured raised beds we had built were perfect for them, so they all carried on growing to full size, and we are now harvesting melons on a daily basis.
They are sweet and honeyed and bursting with flavour.


It feels like a Harvest Festival display in the potager...... and yet it is only the end of August.  However if the amount of new flowers on the cucurbit plants are a sign of things to come, then we should be harvesting all the way through till October.  Anyone for soup.... !


Sunday, 3 June 2012

The Roe Deer are Hungry

We have a small herd of roe deer living in the orchards behind our farm buildings.  A stunning male


leads a herd of 6 young females


and they regularly explore our gardens, coming within feet of the house.  We have always loved watching them delicately picking their way through the buildings, grazing the shrubs and lawns, on guard at all times and ready to flee at any noise.

Unfortunately their love of young tender shoots has cause a few issues.

When planting all of our young trees, we were conscious that we had to protect them from voles and rabbits, so we surrounded them by tree guards


Unfortunately these guards were no match for our hungry deer and many of the leading shoots were torn off the young saplings.

So some replacement saplings were ordered, with some special deer-proof tree guards 4 foot high - apparently the maximum height that a roe deer will graze, and some chestnut stakes.
The fine-holed netting is very stiff and stands four square, when folded and staked with a chestnut stake and a cane support


Only 85 trees needed to be re-netted, and about a third of the saplings needed to be replaced!


On a positive note, the farmer was due to cut the fields and bale the hay, so the taller chestnut stakes made it much easier for him to see the new saplings, and we managed to avoid any casualties.


Thursday, 9 February 2012

The Potager is finished just in time

Immediately after Christmas we were back to work.  Nick actually started making the gates for the potager during Christmas.  He has always worked with wood, and it is his main love.
Having set up all his benches and woodworking tools outside the big barn, he settled to his work in the gentle afternoon sun with the promise of a turkey dinner and mulled wine when he had finished...

We decided we would use post and rail fencing for the whole plot, as it is such a pretty natural form of fencing, so we used a lower two rail version for the potager...

We attached netting to the bottom rail, and a layer of gravel at the bottom to discourage the wildlife from setting up home in the raised beds..

Then with the help of the JCB we finished gravelling the pathways.

We want to grow grapes and kiwis, so we also dug in posts and set up a wire trellis system to support the vines as they get bigger and hopefully heavy with fruit...

Excited that we finally had everything in place, we took a trip to the nearby garden centre and bought our first fruit bushes...
Three raspberry canes - Mailing Promise and Heritage are both summer fruiting, and Fall Gold, an Autumn fruiting yellow raspberry.
Two gooseberry bushes - a white and a purple variety.
Two blueberry bushes for the ericaceous bed, both large fruit varieties.
And three Kiwi vines, one male and two of the female Actinidia variety. 

We planted them all as soon as we returned, and it was a joy to plant in soft raised bed soil, without having to break the heavy clay ground as we did to plant all the trees.

After a short trip back to England to collect some materials for the renovation, a new greenhouse, and two beautiful old vines from Nicks parents, we returned to the sunshine, and to finish the final elements of the potager.  
We had laid a concrete base to secure the greenhouse, so we were able to erect the frame easily. 

And having glazed it, Nick set to work to make the shelving and potting benches I had designed for the inside of the greenhouse.  We had picked up some thick plywoood from England at a really good price, so I have some really sturdy shelving to start this years seedlings, and a good thick bench to pot up, with a place to mix the potting compost.....

And he has even put in a car battery, with a solar panel on the outside of the greenhouse to power it, so that I can connect up the kettle and an Ipod dock to have music and cup of tea whilst I'm working.....perfect!

We just need to buy a water tank and then some guttering to direct the rainwater from the roof to the tank, and I will have an easy way to water the seedlings separate from the main watering system for the beds.

As the weather was starting to turn very chilly, we decided to wrap all the newly bought plants with some fleece...

And we were just in time!

The night time temperatures got lower and lower to -8 degrees, and then it started to snow....


Saturday, 31 December 2011

Building the Potager

We decided to dedicate December to building the potager (the kitchen garden). This was our first real step into self-sufficiency, and it needed to be; easy to manage; easy on the eye; large enough to supply our needs, and to supply a basket of fresh fruit and veg. in a welcome pack for guests to the cottages.

The final plan covers a 20 metre2 plot, bordered on the west side by mature trees, and the south by low farm hedging.


It is a very sunny position and the sun does not go down behind the mature trees until 3pm in the winter, so all the raised beds will be in full sun for most of the day.

The garden has been separated into three main areas.
1.  The fruit and vegetable raised beds....  (click on pictures for larger image)


The raised beds are 10 foot x 5 foot, and between 12 and 20 inches in height - as the plot is on a sloping site.

There are two beds dedicated to fruit, the larger being 10 foot x 10 foot and containing the fruit bushes - raspberries, gooseberries and blueberries, with some rhubarb.  Whilst the smaller will be used to grow strawberries and melons.

The six vegetable beds have been divided into brassicas, root vegetables and legumes, to enable us to rotate the crops each year.  We have used companion planting principles where possible, and used flowers like nasturtiums and marigolds to help us keep pests down.  However this is all design from books and research, and like most novices, I'm sure when we start planting we will learn far more from our experiences as to what likes our plot, soil and weather conditions. 

2.  The Flowerbed and Vines


The greenhouse is situated to get the most sunshine through the day, and the bench and table will have a lovely view over the flowerbed, that will be full of plants to attract the insects - Buddleia; Alyssum; Cornflower; Cosmos and Zinnia.  We will also be planting flowering plants for 'infusions', and intend to experiment with mixes of herbal teas - Chamomile; Verbena; Valerian and Echinacea.

The two vines will be used for table grapes and kiwis, both of which should grow well in this climate.

3.  The Herb Garden and Maintenance


Although we have planted a small amount of herbs in each raised bed, the majority will grow at the entrance to the potager, surrounded by blackberry, sloe and elderflower bushes.

This part of the garden is screened by mature trees, so the compost bins, water butt and leaf mould containers will all be sited here, out of view.

The first step was to measure everything out on the plot and lay out tarpaulin cut to size...


Amazing how small the beds looked when spaced out in the plot.
Then it was down to the JCB to clear the turf and then scrape away the top soil to re-use.


We then had to run all the water pipes from the water butt to supply collected rainwater and agricultural water to each of the beds..


We decided to use seep pipes on each of the beds, so we had to install filters throughout the system to ensure the the pipes did not get clogged with debris.


Then we had to start building the beds.  
Nick pulled up the oak floorboards in the little cottage to re-use for the raised beds.  They were too far gone to keep for floorboards, but when cut down they were still solid enough to recycle.


At the same time we needed to dig through the top soil..


Weeding out two full wheelbarrows of dandelion roots!


We decided to line the raised beds, as we weren't sure if any insect repellants had been used on the floorboards, and didn't want anything seeping into the soil.    The plastic pipes will act as holders for hoops which we can insert when we want to drape parts of the bed with mesh or fleece...


It was finally time to start filling the beds, and again we used the JCB to redistribute the manure from the farm...


We worked on a ratio of one third well-rotted manure and straw, then a layer of clay soil we took from the top of the dried pond, a layer of compost and then a final layer of sifted top soil.  Hopefully this will provide enough nutrients, and will loosen the clay soil sufficiently.  We kept one bed manure-free for the root crops, and part of the fruit bush bed was cordoned off as an ericaceous bed for the blueberries, and we filled with ericaceous compost and top soil.

We finished each bed with the seep pipes...


Then it was time to lay some pathways, before the winter became too muddy and wet...


And with an interesting tipper action for the quad and trailer....


We laid the gravel for the pathways....


And feeling quite deserving of some downtime, we have now packed up our tools, set the wine mulling, and put our order into the sawmills for wood for the fencing....